How many times have you caught yourself turning up the volume to the maximum in the middle of the road just because you couldn’t hear the chorus of your favorite song? If your answer is too many, then you probably have too much road noise coming into your car.
After some time, the road noise can become quite annoying, and that’s why I wanted to share some useful tips for sound deadening car doors with you.
Why You Should Sound Deaden Your Car Doors
If you soundproof your car, you’ll improve the overall quality of your ride. Some of you probably think that soundproofing a car has to do with the exhausts. However, even though that may partially be true, the first thing that you’ll definitely need to soundproof are the doors.
Car doors are the main culprits for hearing too much road noise during your ride. Furthermore, some doors even produce that well-known and annoying rattling sound. That sound is common, especially with older car models.
Without guidance, sound deadening your doors will seem difficult and even impossible. In this article, you’ll be able to find a complete step-by-step guide on how to do it. But before you go into that, let’s look at all the materials and tools that you’ll need in order to do everything right.
Best Sound Deadening Materials for Car Doors
You don’t have to break the bank if you want to sound deaden your car doors. The reason is that there are multiple sound deadening materials on the market with different attributes and prices to choose from. However, since sound deadening your car doors should be a one-time investment, make sure not to buy the cheapest material with the worst properties.
Cheap materials tend to be thin. As a result, they will provide much less insulation than some in a higher price range. Thin materials can pose a problem especially if you drive an old car that doesn’t already have some form of sound deadening material inside the doors.
On the other hand, thick materials are impeccable at sound deadening but they also tend to be pricey. Therefore, it’s vital to find the perfect balance between the noise that your car produces and the budget that you’ll have for this operation.
You can check the article I’ve linked to above. You’ll learn about the benefits and how these materials contribute to the overall silence in your car. But here is a short recap and the 3 best choices.
Noico Sound Deadening Mat
You can consider Noico Sound Deadening Mat as the cost-effective option that provides a fair amount of insulation. This material is 1,5 times thicker than most other insulation products. Therefore, it will able to dampen the road noise and most of the door vibrations that may occur.
If you choose to go with this product, make sure to use a roller to flatten the embossing on the foil. You must make it plain smooth in order to get the most out of it. If you don’t install it properly, the noise will still be able to pass through the space in the grid.
Noico Sound Deadening Mat is a great choice if you’re on a tight budget. Even though it may serve as a temporary solution, you will surely notice the difference once you install it.
Dynamat Xtreme
Dynamat is well known for producing quality and durable soundproofing car materials. Their Dynamat Xtreme mat is made out of high-quality butyl rubber and is pretty easy to install. Since this sound deadening material has its own adhesive, you won’t have to buy any surface prep. It will stick to the car door interior just perfectly.
So why is Dynamat Xtreme so effective? First of all, it will increase the mass of your car doors. As a result, the doors will become more solid than before, and this will prevent vibrations and rattling.
Second, once you install it on the surface of the door, its thickness will stop the road noise from entering the interior of your car. Hence, you will have a quiet ambiance during the ride.
You should go with Dynamat Xtreme if you want to install a proven and reliable product. However, note that you’ll need to spend an extra coin or two in order to completely soundproof all doors in your car with it.
Kilmat Sound Deadening Mat
Kilmat Sound Deadening Mat is 1.5 mm thick and heavy enough to provide efficient sound insulation that you could only get from more robust materials. What’s more, this material will also handle the rattling of your doors and dampen any vibrations that may occur during the ride.
What you’ll really like about this material is that it’s easy to work with. It has a grid indicator on the foil which makes things much easier when cutting.
You’ll be able to cut out any shape even with your scissors. So, if you’re not too fond of working with a straight razor, you’ll find this characteristic to be very rewarding.
Also, when it comes to cutting, please note that this butyl mat will probably become stiff if it’s cold outside. You will have a hard time manipulating it. Therefore, it’s best to cut it in average room temperature.
Above all, Kilmat is a great choice in this price range if you want to sound deaden your car doors because it’s as thick as some pricey materials.
See also: Noico vs. Dynamat (How Do They Compare?)
What Tools to Use
Since I’ve used Dynamat Xtreme to sound deaden my car, I was able to cut it with a utility knife, straight razor, and sharp scissors. Therefore, you can prepare all three and see which one works best for you.
The next thing you’ll need is a screwdriver. Actually, it would be great if you could have a whole set of screwdrivers by your side, just in case. And if you have a screw drill, even better. It will speed up the process, since pulling the car doors apart can take up a considerable amount of time.
Smaller parts can be tricky to separate from the door. Therefore, try to find something that you will be able to put under them as leverage, like a chisel or a small pick.
Furthermore, both Dynamat X and other sound deadening materials need to be rolled over in order to fit snuggly. You don’t want any bumps on the surface. Everything will need to be smooth in order for the insulation to work. Most of these mats don’t include an appropriate roller in the package, so you’ll need to either use a roller that you have or buy one.
Before you start installing the sound deadening mat, you’ll need to clean the door thoroughly. Therefore, make sure to have a piece of cloth and some alcohol by your side.
Now, let’s summarize everything so that you don’t forget something along the way.
Tools:
- A roller
- A piece of cloth and some alcohol
- A chisel or a small pick
- A screw drill or a set of screwdrivers
- A straight razor, scissors or a utility knife
How to Sound Deaden a Car Door (Step-by-Step)
OK, so you’re finally here. This is the meat. Now, you’ll need to pay close attention and follow these steps to the point in order to make everything work. Sound deadening car doors isn’t easy, but it shouldn’t scare you. Just be focused, relaxed, and have patience. It might take you a whole day to finish, so be ready to free up your schedule.
A Word of Advice Before You Proceed
Before you check whether you have all the tools and materials, I advise you to look for your car manual. If you don’t have it by your side, you can google to see how other people pulled the doors apart on the same model as yours.
Finding your manual is vital, since not all car doors are the same. In the following lines, I’ll try to show you the most general approach when it comes to taking apart and sound deadening car doors. But don’t take everything literally since your car doors might be slightly different.
1. Take the Car Door Apart
Open the door of your choice all the way. Before you get ready to remove the screws, make sure to take another look at your car manual. Most of the screws are probably covered by pieces of plastic, and your car manual will indicate how to remove them.
You can take off these pieces with a chisel if you have one. If not, even a flat screwdriver might do the job. Just make sure not to apply too much force, or you’ll break something.
Once the plastic is off, you’ll see the screws on the panel. It’s probably a good idea to bring your phone with you and photograph them for reference. Also, categorize them as you take them off so that you can discern what goes where when you start putting everything back together.
Start unscrewing them either manually or with a screw drill if you have one. Once you’re done with the panel, don’t forget to take off the screws that are located on the part of the door that you don’t see when the door is closed.
Now, you’ll need to use a chisel again in order to remove the panel. Starting from the bottom and moving the chisel all the way around the panel will work in theory. However, check your manual or some relevant YouTube videos that show how to do that for your car model.
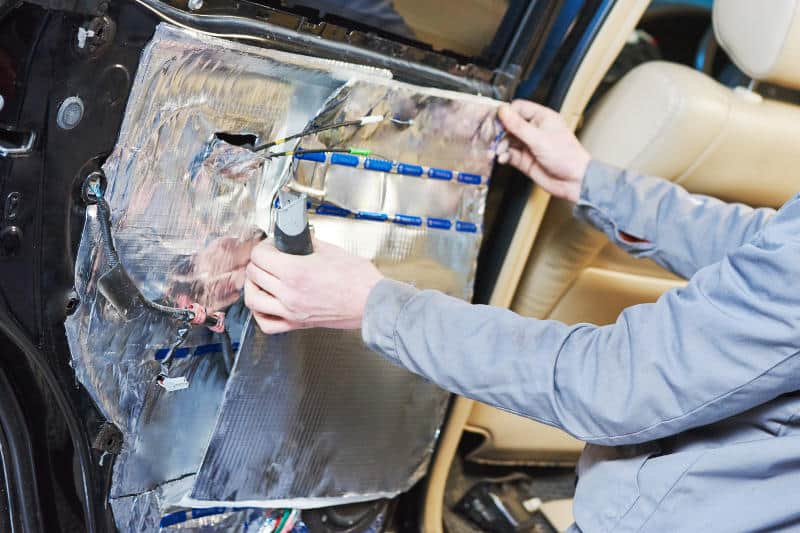
Once the panel is off, disconnect any wires and remove the speakers. Before you do that, don’t forget to take another photo for reference. Below the panel, you’ll find a layer of foam or plastic wrap. Make sure to remove it carefully, since you’ll want to get it back later.
Steps for Taking the Door Apart:
- Take off the plastic that covers the screws with a chisel.
- Remove all screws.
- Remove the panel with a chisel.
- Disconnect wires and remove the speakers.
- Remove the foam protection layer.
- Don’t forget to take photos before you remove something.
2. Prepare the Door
Before you start installing a sound deadening mat to your doors, you’ll have to make sure that they are clean. These mats have their own adhesive that won’t stick well if there are dust and dirt on your doors.
Therefore, take a wet piece of cloth and clean every part thoroughly. It’s also advisable to rub alcohol afterward just to make sure that everything is clean as a whistle.
3. Apply Your Sound Deadening Mat
Let your doors dry well, and start cutting out the pieces of the mat that will fit into the metal parts of your door. These pieces can have an irregular or any kind of shape that will fit.
Thick sound deadening mats like Dynamat X will provide better insulation, but you will also have a hard time cutting them. Therefore, make sure to use really sharp objects like utility knives. Also, wearing some protection gloves at this point would be a good idea, since you can cut yourself if you’re not careful enough.
You should apply the sound deadening material both on the frame and through the holes in the inside of the door.
First, take off the protection layer from the piece of mat, put it through the hole in the frame and stick it to the inside of the door. Next, slide your hands over the mat in order to flatten out air bubbles. Finally, use a roller to smooth the surface.
Note that you don’t have to cover the whole door from the inside in order to achieve solid insulation.
You can knock on the outside of the door to check how much the sound is dampened after you stick each piece of the mat. Once you’re satisfied with the level of dampening, you can use the roller once again to smooth everything out one last time.
The next step would be to cover the frame of the door. It’s advisable to cover every single part of it, but even if you don’t, you’ll still get decent results.
Once you’ve flattened out every piece with a roller, you can proceed to put the door back together. Just make sure to double check that there aren’t any air bubbles left.
Instructions for applying sound deadening materials to car doors:
- Clean the door with a clean piece of cloth and water then rub with alcohol.
- Cut the sound dampening mat into desired shapes.
- Remove the protection layer from the mat.
- Stick the pieces of mat through the holes in the frame and on the inside of the door.
- Flatten the mat with your hand to remove air bubbles.
- Smooth the surface with a roller.
- Apply the mat on the frame.
- Repeat step 5 and step 6 on this list if needed.
4. Put Everything Back Together
If you followed this guide closely, then you’ve probably taken photographs of each step of the process. Therefore, you can now use them for reference to put everything back where it belongs.
The protective layer goes first. However, you might need to apply some glue or another type of adhesive on its edges in order to stick it back in place. Next, put the speakers and connect the wires.
After you’ve made sure that everything is connected as it used to be, you can put on the panel and screw it to the frame. Check the manual once again and pop the plastic bits back into place.
And there you have it. Your car door is now soundproof. Unfortunately, you’re not finished yet because you’ll have to repeat the whole process with the rest of the doors.
Final Tips for Soundproofing Car Doors
Soundproofing your car doors may feel exhausting because it takes a lot of time to do it. It will take you a lot of time especially if you never took a car door apart before.
Therefore, it’s better to take a day or two and rest from sound deadening than forcing yourself to do one door a day. Otherwise, you might lose focus and leave some air bubbles that will ruin the efficiency of the sound deadening material. As a result, you’ll have to repeat the whole process.
Furthermore, in order to achieve the best results, I advise you to stay patient, follow this guide, take photos for reference, and consult your car manual every now and then.
Finally, you should check out how to fix rattling car speakers and stop the door rattle. If you combine those pieces of advice with the ones featured here, you’ll get the ultimate recipe for driving in silence.
RELATED POSTS:
- How to Fix Rattling Car Speakers
- Best Lubricants for Car Door Hinges
- The Cost of Fixing a Dent in Your Door
By