Adding aftermarket car audio parts allows you to build a powerful speaker system for blasting your favorite tunes. However, adding these parts can also produce a rattling noise that gets in the way of your audio enjoyment.
If you are tired of listening to a rattle every time that you play music, there are a few steps that you can take to fix the rattling.
FEATURED PRODUCTS:
Table could not be displayed.
- 1. Remove Items from the Pockets in the Door Panels
- 2. Locate the Speaker Creating the Problem
- 3. Inspect the Speaker Mounting for Loose Screws
- 4. Determine Whether the Rattling Comes from a Blown Speaker
- 5. Use a Car Speaker Enhancement Kit to Reduce Rattling
- 6. Install Bass Blockers to Limit Low Frequencies from Side Speakers
- 7. Check the Car Body Panels for Vibrations or Rattling
- 8. Cover the Inside of the Door with Sound Deadening Materials
- 9. Take Your Vehicle to a Professional Car Audio Shop
- In Conclusion
1. Remove Items from the Pockets in the Door Panels
Before you need to remove any screws or repair any speakers, you should start your troubleshooting with the easiest issue to fix.
Rattling noises are sometimes caused by loose items inside the pockets of the door panels. Loose change, pens, sunglasses, and other items may rattle when you play music. Remove any items from the doors, and test your audio.
Hopefully, the rattling will stop. If it continues, you will need to look elsewhere.
2. Locate the Speaker Creating the Problem
The first step in stopping your car audio system from rattling is to find the source of the rattle. To determine which speaker is rattling, you can adjust the fade and balance on the stereo receiver.
In most cases, the rattling is coming from one speaker. Adjusting the fade allows you to move the sound to the front or rear speakers, while adjusting the balance moves the sound between the left and right speakers.
After finding the speaker responsible for the rattle, you can attempt to fix the issue. I typically find that loose screws are the most common cause of rattling speakers. However, there are several potential causes, including blown speakers and vibrations from the car panels.
If you want to solve the rattle or vibration, work your way through the following list of troubleshooting techniques:
- Inspect the speaker mounting
- Determine if the speaker is blown
- Install bass blockers
- Check the car body panels
Start at the top, and work your way through these steps. By the time you get to the end, your car audio problem should be solved.

3. Inspect the Speaker Mounting for Loose Screws
If the rattling speaker is inside a door, you may need to remove the door panel to access the speaker. Most door panels have a series of plastic tabs that cover the screws. Using a flathead screwdriver, you can pop these tabs out and then remove the screws.
After removing the door panel, you can inspect the speaker mounting. Adjust the fade, balance, and volume to ensure that you can reproduce the rattle.
As you play music, listen for the rattling or vibration. Hold the speaker in place and listen for the rattling to stop. If the rattling stops, loose screws are likely to blame.
You can attempt to tighten the screws. Sometimes, adding a washer to each screw can help prevent rattling and make it easier to get a tight fit.
Tightening the screws often solves the problem. However, if the rattling continues, you may be dealing with blown speakers.
4. Determine Whether the Rattling Comes from a Blown Speaker
When holding a speaker in place to check the mounting, the vibration or rattling may still occur. With the door panel removed and your hand on the speaker, you can rule out vibrations from the panel and rattles from loose screws.
The next possible cause is a blown speaker. A tear in the outer cone of the speaker can create some distortion and vibration.
Remove the plastic or foam speaker cover, and inspect the outer cone. Tears typically appear near the outer rim. Along with tears, you may notice large chunks missing.
You can often fix tears with a piece of duct tape. Cut the duct tape to completely seal the tear, and then test the speaker for vibrations.
If you do not detect a tear on the outer cone, there may be a tear on the inner reflexive cone. To inspect this part of the speaker, you will need to remove it from the mounting. Remove the screws, and look for tears in the cone, which can also be repaired using a piece of duct tape.
After repairing the tear, test your audio again. If the rattling or vibration continues, there is one more troubleshooting step that you can take.
5. Use a Car Speaker Enhancement Kit to Reduce Rattling
After tightening the screws, if the speakers continue to rattle, try installing a car speaker enhancement kit.
When you install aftermarket speakers, you may not get a perfect seal between the speaker and the mounting. Even when using OEM speakers, the design may not include extra vibration dampening behind the speaker.
The enhancement kits include foam rings and backing, creating a better acoustic seal. The foam dampens vibrations, reflections, and keeps the speaker from rattling in the mounting.
With the FAST Rings Car Speaker Enhancement Kit (Amazon), you get everything needed to cover two 6.5-inch speakers. The Road Kill Foam Speaker Enhancer includes the same components, but is designed for 6-inch and 6.5-inch speakers. While they are essentially the same product, the Road Kill foam rings are a little less expensive.
No matter which option you choose, you can easily reduce panel vibrations and reflections inside the car door. After removing the door panel, installing the foam pieces takes a few minutes.
Just make sure that you get the right size rings for your speakers – these sets cover 6-inch or 6.5-inch speakers.
No products found.
The first foam ring acts as a gasket for connecting the speaker mounting to the baffle plate surface. The second ring goes around the outside of the speaker. The third piece is a pad that goes behind the speaker, absorbing reflections on hard surfaces.
The foam enclosure boxes in the speaker and isolates the sounds from the door cavity, directing the audio into the cabin. You get more of the mid-range frequencies and a cleaner sound.
6. Install Bass Blockers to Limit Low Frequencies from Side Speakers
When you rule out all other possibilities, low-frequency sounds may be the problem. Most side speakers are not designed to handle loud, low-frequency sounds, such as a loud bass. When you turn up the volume, the distortion may cause the speakers to vibrate and rattle.
The subwoofer in your trunk should handle most of the lower frequencies, while the side speakers receive the upper frequencies. By installing bass blockers for the side speakers, you can eliminate the problem.
Bass blockers are frequency filters that are installed in-line between the speaker and the receiver. They cut off lower frequencies, while allowing mid to high frequencies, ensuring that your subwoofer receives most of the bass.
7. Check the Car Body Panels for Vibrations or Rattling
Rattling sounds can also come from the car body panels. The panels on the dashboard, car doors, and headliners all have a resonant frequency. When that frequency is played through the speakers, the resulting vibrations can create a rattling sound.
At the beginning of the troubleshooting process, you remove the car door panels to check the mounting of the side speakers. If the rattling immediately stops after removing the panels, you know that the panels are the most likely cause.
To deal with a vibrating panel, you can install vibration-damping materials. While some people simply install wall insulation, there are products that are specifically designed for improving car audio sound systems.
You may purchase precut sheets that are designed for installation in specific areas of your car. For example, there are pre-cut sheets that are designed to fit doors, trunks, and floorboards. While they may need to be trimmed to get an exact match with your car, they provide the most convenient way to add damping material.
If you want to dampen sound throughout the entire car, the most cost-effective option is to purchase the material in bulk. You can then cut the pieces that you need and install them throughout your car.
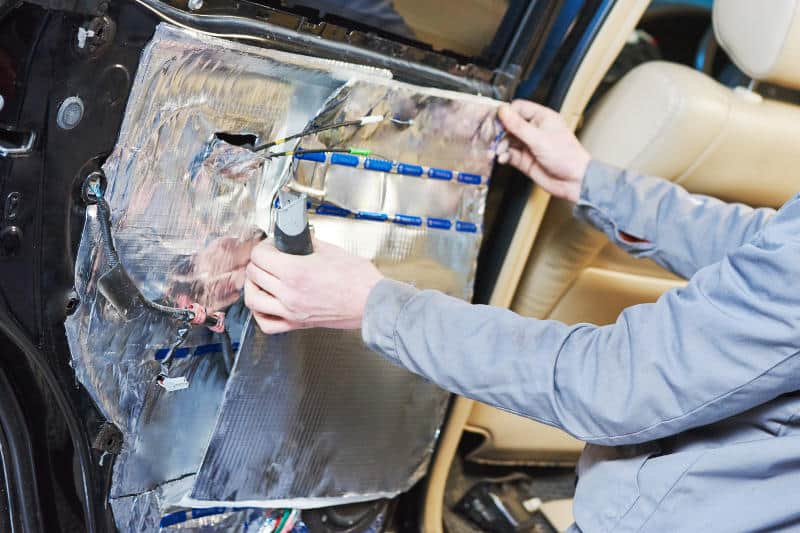
8. Cover the Inside of the Door with Sound Deadening Materials
You may also want to consider installing sound deadening materials, even if you have solved the rattling with an earlier troubleshooting step.
Adding these kind of material helps to improve the overall quality of your car audio. Besides eliminating vibrations, the deadening material reduces road noise too.
These products are available for various areas of your vehicle, including:
- Doors
- Trunks
- Hoods
- Floors
- Speakers
Installing deadening material in the door panels requires the most steps, as you need to remove the door panels. On the other hand, when you want to install it to the floors, trunk, or hood, you typically just need to cut it to size.
These products often have an adhesive side, allowing you to secure the material to any surface. Before placing the material in your trunk or on the floors, you may need to remove mats or other protective material.
If you decide to add damping material inside the hood, you need to use heat-resistant material. Specially designed material helps to eliminate noise from the engine that may travel through the rest of the vehicle.
You can also purchase material that fits around the speakers, such as insulating speaker baffles. These products help to reduce vibrations from the speakers, while improving the sound.
Whether you decide to place deadening material on the floors, inside the hood, or in the doors, you need to cut the material to fit your vehicle. Before you remove the adhesive backing, position the material and use a marker to trace the outline that you need to cut.

- Reduces Unwanted Noise, Heat & Vibration...
- Trusted by Car Lovers & Professionals Alike...
- Xtreme Bulk Pack: This pack contains...
- Thin, Flexible & Easy to Cut: Installing...
For door panels, you also need to deal with screws. After cutting the material to size, remove the door panel, and position the material against the inside of the door. Press hard to create indentations where the screws belong. You can then cut out the holes for the screws.
Before installing the material inside the door panel, remove the plastic weather guard, and clean the metal surface.
When adding this sound deadening material, you can use a heat gun to help warm the adhesive material and make it more flexible. This allows you to mold the material for a custom fit, which improves the overall performance of the material.
9. Take Your Vehicle to a Professional Car Audio Shop
After completing these troubleshooting steps, the speaker rattling should be solved. However, there are many components throughout your vehicle that can rattle when loud music played.
If you still detect an annoying rattle, you may need to consider taking your vehicle to a professional car audio shop. Allow an expert to examine your vehicle and car audio system to get to the bottom of the problem.
In Conclusion
In the end, most cars will have a rattling sound when the music contains loud bass. Luckily, there are ways to reduce the rattling. Ensuring that the speakers are securely mounted, adding damping material, and repairing tears in the speaker cone often solve the problem. However, when the problem persists, a car audio expert may be needed.
OTHER RELATED POSTS:
- Is It Illegal to Blast Music in Your Car?
- Noico vs. Dynamat: Review & Comparison
- Speakers Making Noise When Your Car Is Off?
- How to Prevent Car Doors From Slamming
- Best Cheap Car Speakers on the Market
By